Friday, November 12, 2010

Tutorial: Drawing a Grid in a iPhone UITableView – Tabular Cell Data


UITableView is probably the most used view on the iPhone. It’s flexible and the UI is ideally suited to use on the iPhone. There are lots of examples on how to add multiple items to a UITableViewCell. However, I needed to present some data in a more traditional spreadsheet style grid. The results worked well and enabled me to pack a lot of information on the screen that was very hard to follow without the vertical grid. I’ll show a very simplified version here you can use to add vertical lines to your UITableView.
First we need to create a subclass of UITableViewCell. This is so we can override drawrect and draw our lines and to add an array to hold a list of positions where we’ll draw the lines.

@interface MyTableCell : UITableViewCell {
 NSMutableArray *columns;
}
- (void)addColumn:(CGFloat)position;
@end
 
In this simplified example we’ll leave the positioning of the actual text in the cells in the UITableViewController and place it manually (full source code is attached at the end). We’re just providing a mechanism for drawing vertical lines to make a grid. Column locations are added by calling addColumn:
- (void)addColumn:(CGFloat)position {
 [columns addObject:[NSNumber numberWithFloat:position]];
}
Now lets override drawRect. In it we grab the current graphics context and set the line color and width. Then we iterate over our columns array drawing a line from the top of the cell row to the bottom at each position stored in the array.


 - (void)drawRect:(CGRect)rect {
 CGContextRef ctx = UIGraphicsGetCurrentContext();
 // Use the same color and width as the default cell separator for now
 CGContextSetRGBStrokeColor(ctx, 0.5, 0.5, 0.5, 1.0);
 CGContextSetLineWidth(ctx, 0.25);

 for (int i = 0; i < [columns count]; i++) {
  CGFloat f = [((NSNumber*) [columns objectAtIndex:i]) floatValue];
  CGContextMoveToPoint(ctx, f, 0);
  CGContextAddLineToPoint(ctx, f, self.bounds.size.height);
 }

 CGContextStrokePath(ctx);

 [super drawRect:rect];
}
 
To add columns to the view just call
[cell addColumn:50];
when you’re building each cell.

- (UITableViewCell *)tableView:(UITableView *)tableView cellForRowAtIndexPath:(NSIndexPath *)indexPath {

 NSString *MyIdentifier = [NSString stringWithFormat:@"MyIdentifier %i", indexPath.row];

 MyTableCell *cell = (MyTableCell *)[tableView dequeueReusableCellWithIdentifier:MyIdentifier];

 if (cell == nil) {
  cell = [[[MyTableCell alloc] initWithFrame:CGRectZero reuseIdentifier:MyIdentifier] autorelease];

  UILabel *label = [[[UILabel alloc] initWithFrame:CGRectMake(0.0, 0, 30.0,
                 tableView.rowHeight)] autorelease];
  [cell addColumn:50];
  label.tag = LABEL_TAG;
  label.font = [UIFont systemFontOfSize:12.0];
  label.text = [NSString stringWithFormat:@"%d", indexPath.row];
  label.textAlignment = UITextAlignmentRight;
  label.textColor = [UIColor blueColor];
  label.autoresizingMask = UIViewAutoresizingFlexibleRightMargin |
  UIViewAutoresizingFlexibleHeight;
  [cell.contentView addSubview:label]; 

  label =  [[[UILabel alloc] initWithFrame:CGRectMake(60.0, 0, 30.0,
               tableView.rowHeight)] autorelease];
  [cell addColumn:120];
  label.tag = VALUE_TAG;
  label.font = [UIFont systemFontOfSize:12.0];
  // add some silly value
  label.text = [NSString stringWithFormat:@"%d", indexPath.row * 4];
  label.textAlignment = UITextAlignmentRight;
  label.textColor = [UIColor blueColor];
  label.autoresizingMask = UIViewAutoresizingFlexibleRightMargin |
  UIViewAutoresizingFlexibleHeight;
  [cell.contentView addSubview:label];
 }

 return cell;
}
That’s it. Being a bit dense I beat my head on my desk a few days before it become obvious how blindingly simple it really was. A lot was just learning ObjectiveC and how UIKit works in general. I’m now working on a GridTableView library that will add a good bit of functionality and ease of use. I’ll post it here.
Here’s the source code.

Wednesday, November 3, 2010

What is HSB/HSV Color Spaces?

The HSV (Hue, Saturation, Value) model, also called HSB (Hue, Saturation, Brightness), defines a color space in terms of three components:
  • Hue

    In HSV, hue represents color. In this model, hue is an angle from 0 degrees to 360 degrees.
AngleColor
0-60Red
60-120Yellow
120-180Green
180-240Cyan
240-300Blue
300-360Magenta
  • Saturation

    Saturation indicates the range of grey in the color space. It ranges from 0 to 100%. Sometimes the value is calculated from 0 to 1. When the value is '0,' the color is grey and when the value is '1,' the color is a primary color. A faded color is due to a lower saturation level, which means the color contains more grey.
  • Value

    Value is the brightness of the color and varies with color saturation. It ranges from 0 to 100%. When the value is '0' the color space will be totally black. With the increase in the value, the color space brightness

Applications of HSV

The HSV color space is widely used to generate high quality computer graphics. In simple terms, it is used to select various different colors needed for a particular picture. An HSV color wheel is used to select the desired color. A user can select the particular color needed for the picture from the color wheel. It gives the color according to human perception.

Some applications use also other kinds of this model. For instance, S and B/V with can vary from 0 up to 1, H may be normalized to 0-100%, or all three parameters can vary from 0 up to 255. Just Color Picker uses the [degree, percent, percent] notation.
It is sometimes preferable in working with art materials, digitized images, or other media, to use the HSV or HSL color model over alternative models such as RGB or CMYK, because of differences in the ways the models emulate how humans perceive color. RGB and CMYK are additive and subtractive models, respectively, modelling the way that primary color lights or pigments (respectively) combine to form new colors when mixed.
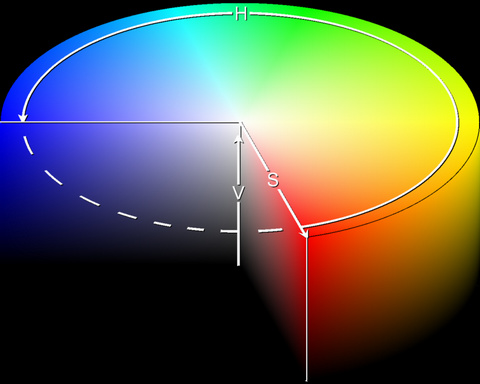
Graphical depiction of HSV
Graphical depiction of HSV. References: Wikipedia


HSV Representations

The HSV color wheel is used to pick the desired color. Hue is represented by the circle in the wheel. A separate triangle is used to represent saturation and value. The horizontal axis of the triangle indicates value and the vertical axis represents saturation. When you need a particular color for your picture, first you need to pick a color from the hue (the circular region), and then from the vertical angle of the triangle you can select the desired saturation. For brightness, you can select the desired value from the horizontal angle of the triangle.
Sometimes the HSV model is illustrated as a cylindrical or conical object. When it is represented as a conical object, hue is represented by the circular part of the cone. The cone is usually represented in the three-dimensional form. The saturation is calculated using the Glossary Link radius of the cone and value is the height of the cone. A hexagonal cone can also be used to represent the HSV model. The advantage of the conical model is that it is able to represent the HSV color space in a single object. Due to the two-dimensional nature of computer interfaces, the conical model of HSV is best suited for selecting colors for computer graphics.
The application of the cylindrical model of HSV color space is similar to the conical model. Calculations are done in a similar way. Theoretically, the cylindrical model is the most accurate form of HSV color space calculation. In practical use, it is not possible to distinguish between saturation and hue when the value is lowered. The cylindrical model has lost its relevance due to this and the cone shape is preferred over it.

Advantages of HSV

The HSV color space is quite similar to the way in which humans perceive color. The other models, except for HSL, define color in relation to the primary colors. The colors used in HSV can be clearly defined by human perception, which is not always the case with Glossary Link RGB or Glossary Link CMYK.

HSV Alernatives

RGB, CMYK and HSL are some f the alternative models of color space.

Tuesday, October 19, 2010

keyboard shortcuts in Windows XP

Keyboard Shortcut

Result in Windows ® XP - General

CTRL and A Selects all the items in the active window.
CTRL and C Copies the item or items to the Clipboard and can be pasted using CTRL and V.
CTRL and F Displays the Find all files dialog box.
CTRL and G Displays the Go to folder dialog box.
CTRL and N Displays the New dialog box.
CTRL and O Displays the Open dialog box.
CTRL and P Displays the Print dialog box.
CTRL and S Displays the Save dialog box.
CTRL and V Pastes the copied item or items from the Clipboard.
CTRL and X Cuts the item or items selected to the Clipboard.
CTRL and Z Undoes the last action.
CTRL and F4 Closes the active document window.
CTRL while dragging an item Copy the selected item
CTRL+SHIFT with arrow keys Highlight a block of text
CTRL+F4 Close the active document
CTRL+ESC Display the Start menu
CTRL and F6 Opens the next document window in the active application.

Keyboard Shortcut

Result in Windows ® XP - General

ALT+ENTER View the properties for the selected item
ALT+F4 Close the active item, or quit the active program
ALT+SPACEBAR Open the shortcut menu for the active window
ALT+TAB Switch between the open items
ALT+ESC Cycle through items in the order that they had been opened

Keyboard Shortcut

Result in Windows ® XP - General

F1 key Gives help on the active window or selected item.
F2 key Rename the selected item
F3 key Search for a file or a folder
F4 key Display the Address bar list in My Computer or Windows Explorer
F5 key  Update the active window
F6 key Cycle through the screen elements in a window or on the desktop
F10 key Activate the menu bar in the active program

Keyboard Shortcut

Result in Windows ® XP - General

Windows Logo Display or hide the Start menu
Windows Logo+BREAK Display the System Properties dialog box
Windows Logo+D Display the desktop
Windows Logo+M Minimize all of the windows
Windows Logo+SHIFT+M Restore the minimized windows
Windows Logo+E Open My Computer
Windows Logo+F Search for a file or a folder
CTRL+Windows Logo+F Search for computers
Windows Logo+F1 Display Windows Help
Windows Logo+ L Lock the keyboard
Windows Logo+R  Open the Run dialog box
Windows Logo+U Open Utility Manager

Keyboard Shortcut

Result in Windows ® XP - Dialogue Box

TAB Move forward through the options
SHIFT+TAB Move backward through the options
CTRL+TAB Move forward through the tabs
CTRL+SHIFT+TAB Move backward through the tabs
ALT+Underlined letter Perform the corresponding command or select the corresponding option
ENTER Perform the command for the active option or button
SPACEBAR Select or clear the check box if the active option is a check box
F1 key Display Help
F4 key Display the items in the active list
Arrow keys Select a button if the active option is a group of option buttons
BACKSPACE Open a folder one level up if a folder is selected in the Save As or Open dialog box

Keyboard Shortcut

Result in Windows ® XP - Windows Explorer

END Display the bottom of the active window
HOME Display the top of the active window
NUM LOCK+Asterisk sign (*) Display all of the subfolders that are under the selected folder
NUM LOCK+Plus sign (+) Display the contents of the selected folder
NUM LOCK+Minus sign (-) Collapse the selected folder
LEFT ARROW Collapse the current selection if it is expanded, or select the parent folder
RIGHT ARROW Display the current selection if it is collapsed, or select the first subfolder


Windows system key combinations

  • F1: Help
  • CTRL+ESC: Open Start menu
  • ALT+TAB: Switch between open programs
  • ALT+F4: Quit program
  • SHIFT+DELETE: Delete item permanently
  • Windows Logo+L: Lock the computer (without using CTRL+ALT+DELETE)

Windows program key combinations

  • CTRL+C: Copy
  • CTRL+X: Cut
  • CTRL+V: Paste
  • CTRL+Z: Undo
  • CTRL+B: Bold
  • CTRL+U: Underline
  • CTRL+I: Italic

Mouse click/keyboard modifier combinations for shell objects

  • SHIFT+right click: Displays a shortcut menu containing alternative commands
  • SHIFT+double click: Runs the alternate default command (the second item on the menu)
  • ALT+double click: Displays properties
  • SHIFT+DELETE: Deletes an item immediately without placing it in the Recycle Bin

General keyboard-only commands

  • F1: Starts Windows Help
  • F10: Activates menu bar options
  • SHIFT+F10 Opens a shortcut menu for the selected item (this is the same as right-clicking an object
  • CTRL+ESC: Opens the Start menu (use the ARROW keys to select an item)
  • CTRL+ESC or ESC: Selects the Start button (press TAB to select the taskbar, or press SHIFT+F10 for a context menu)
  • CTRL+SHIFT+ESC: Opens Windows Task Manager
  • ALT+DOWN ARROW: Opens a drop-down list box
  • ALT+TAB: Switch to another running program (hold down the ALT key and then press the TAB key to view the task-switching window)
  • SHIFT: Press and hold down the SHIFT key while you insert a CD-ROM to bypass the automatic-run feature
  • ALT+SPACE: Displays the main window's System menu (from the System menu, you can restore, move, resize, minimize, maximize, or close the window)
  • ALT+- (ALT+hyphen): Displays the Multiple Document Interface (MDI) child window's System menu (from the MDI child window's System menu, you can restore, move, resize, minimize, maximize, or close the child window)
  • CTRL+TAB: Switch to the next child window of a Multiple Document Interface (MDI) program
  • ALT+underlined letter in menu: Opens the menu
  • ALT+F4: Closes the current window
  • CTRL+F4: Closes the current Multiple Document Interface (MDI) window
  • ALT+F6: Switch between multiple windows in the same program (for example, when the Notepad Find dialog box is displayed, ALT+F6 switches between the Find dialog box and the main Notepad window)

Shell objects and general folder/Windows Explorer shortcuts

For a selected object:
  • F2: Rename object
  • F3: Find all files
  • CTRL+X: Cut
  • CTRL+C: Copy
  • CTRL+V: Paste
  • SHIFT+DELETE: Delete selection immediately, without moving the item to the Recycle Bin
  • ALT+ENTER: Open the properties for the selected object

To copy a file

Press and hold down the CTRL key while you drag the file to another folder.

To create a shortcut

Press and hold down CTRL+SHIFT while you drag a file to the desktop or a folder.

General folder/shortcut control

  • F4: Selects the Go To A Different Folder box and moves down the entries in the box (if the toolbar is active in Windows Explorer)
  • F5: Refreshes the current window.
  • F6: Moves among panes in Windows Explorer
  • CTRL+G: Opens the Go To Folder tool (in Windows 95 Windows Explorer only)
  • CTRL+Z: Undo the last command
  • CTRL+A: Select all the items in the current window
  • BACKSPACE: Switch to the parent folder
  • SHIFT+click+Close button: For folders, close the current folder plus all parent folders

Windows Explorer tree control

  • Numeric Keypad *: Expands everything under the current selection
  • Numeric Keypad +: Expands the current selection
  • Numeric Keypad -: Collapses the current selection.
  • RIGHT ARROW: Expands the current selection if it is not expanded, otherwise goes to the first child
  • LEFT ARROW: Collapses the current selection if it is expanded, otherwise goes to the parent

Properties control

  • CTRL+TAB/CTRL+SHIFT+TAB: Move through the property tabs

Accessibility shortcuts

  • Press SHIFT five times: Toggles StickyKeys on and off
  • Press down and hold the right SHIFT key for eight seconds: Toggles FilterKeys on and off
  • Press down and hold the NUM LOCK key for five seconds: Toggles ToggleKeys on and off
  • Left ALT+left SHIFT+NUM LOCK: Toggles MouseKeys on and off
  • Left ALT+left SHIFT+PRINT SCREEN: Toggles high contrast on and off

Microsoft Natural Keyboard keys

  • Windows Logo: Start menu
  • Windows Logo+R: Run dialog box
  • Windows Logo+M: Minimize all
  • SHIFT+Windows Logo+M: Undo minimize all
  • Windows Logo+F1: Help
  • Windows Logo+E: Windows Explorer
  • Windows Logo+F: Find files or folders
  • Windows Logo+D: Minimizes all open windows and displays the desktop
  • CTRL+Windows Logo+F: Find computer
  • CTRL+Windows Logo+TAB: Moves focus from Start, to the Quick Launch toolbar, to the system tray (use RIGHT ARROW or LEFT ARROW to move focus to items on the Quick Launch toolbar and the system tray)
  • Windows Logo+TAB: Cycle through taskbar buttons
  • Windows Logo+Break: System Properties dialog box
  • Application key: Displays a shortcut menu for the selected item

Microsoft Natural Keyboard with IntelliType software installed

  • Windows Logo+L: Log off Windows
  • Windows Logo+P: Starts Print Manager
  • Windows Logo+C: Opens Control Panel
  • Windows Logo+V: Starts Clipboard
  • Windows Logo+K: Opens Keyboard Properties dialog box
  • Windows Logo+I: Opens Mouse Properties dialog box
  • Windows Logo+A: Starts Accessibility Options (if installed)
  • Windows Logo+SPACEBAR: Displays the list of Microsoft IntelliType shortcut keys
  • Windows Logo+S: Toggles CAPS LOCK on and off

Dialog box keyboard commands

  • TAB: Move to the next control in the dialog box
  • SHIFT+TAB: Move to the previous control in the dialog box
  • SPACEBAR: If the current control is a button, this clicks the button. If the current control is a check box, this toggles the check box. If the current control is an option, this selects the option.
  • ENTER: Equivalent to clicking the selected button (the button with the outline)
  • ESC: Equivalent to clicking the Cancel button
  • ALT+underlined letter in dialog box item: Move to the corresponding item

Thursday, October 7, 2010

Safari Hotkeys


Web page shortcuts

Up/down arrow keysScroll page vertically by a small amount
Left/right arrow keysScroll page horizontally by a small amount
Option-arrow keysScroll page by a screenfull, minus a small overlap
Cmd-up/down arrow keyScroll to top-left or bottom-left corner of web page
SpacebarScroll page down by a screenfull, minus a small overlap
Delete keyGo back
Shift-Delete keyGo forward
Page Up key/Page Down keyScroll page by a screenfull, minus a small overlap
Home keyScroll to top-left corner of web page
Cmd-Home keyGo to the Home page
End keyScroll to bottom-left corner of web page
Esc keyIf location field selected, restore viewed URL
Cmd-click or Cmd-Shift-click a linkOpen link in new window or tab
Option-click a linkDownload file
Shift-click the Add Bookmark buttonAdd bookmark directly to menu
Cmd-return or Cmd-Shift-return in address fieldOpen page in new window or tab
Cmd-return or Cmd-Shift-return in search fieldShow search results in new window or tab
Press and hold Back or Forward buttonPop up a menu showing up to 10 back/forward entries by page title
Option-press and hold Back or Forward buttonPop up a menu showing up to 10 back/forward entries by page URL

Bookmarks view shortcuts

Delete keyDelete selected bookmarks
Return keyStart or finish editing name of selected bookmark
Tab keyWhen editing, move to next editable cell
Spacebar or Double-clickOpen selected bookmark
Cmd-double-clickOpen selected bookmark in a new window
Option-click New Folder buttonPut selected items in new folder

Menu shortcuts

Cmd-ASelect All
Cmd-BShow/Hide Favorites Bar
Cmd-CCopy
Cmd-DAdd Bookmark…
Cmd-EUse Selection for Find
Cmd-FFind…
Cmd-GFind Again
Cmd-HHide Safari
Cmd-JJump to Selection
Cmd-KBlock Pop-up Windows
Cmd-LOpen Location…
Cmd-MMinimize
Cmd-NNew Window
Cmd-OOpen File…
Cmd-PPrint
Cmd-QQuit Safari
Cmd-RReload Page
Cmd-SSave As
Cmd-TNew Tab
Cmd-VPaste
Cmd-WClose Window or Close Tab
Cmd-XCut
Cmd-ZUndo
Cmd-Shift-AAutoFill Form
Cmd-Shift-BSend File To Bluetooth Device… or Bookmark this group of tabs
Cmd-Shift-DAdd Bookmark to Menu
Cmd-Shift-FFull Screen
Cmd-Shift-GFind Previous
Cmd-Shift-HGo to the Home page
Cmd-Shift-KBlock Images and Plugins
Cmd-Shift-LSearch with Google
Cmd-Shift-MMax Screen
Cmd-Shift-NAdd Bookmark Folder
Cmd-Shift-PPage Setup…
Cmd-Shift-SStart Sampling
Cmd-Shift-TStop Sampling
Cmd-Shift-UOpen URL in OmniWeb
Cmd-Shift-WClose Window
Cmd-Shift-YMake new Sticky Note
Cmd-Shift-ZRedo
Cmd-Option-AActivity
Cmd-Option-BShow All Bookmarks
Cmd-Option-EEmpty Cache…
Cmd-Option-FGoogle Search…
Cmd-Option-HHide Others
Cmd-Option-KMark Page for SnapBack
Cmd-Option-LDownloads
Cmd-Option-MMinimize All
Cmd-Option-PSnapBack to Page
Cmd-Option-SSnapBack to Search
Cmd-Option-VView Source
Cmd-Option-W or Cmd-Option-Shift-WClose All Windows
Cmd-Ctrl-DAdd SafariStand Bookmark
Cmd-Ctrl-SSave Browser Window…
Cmd-1 to Cmd-9First 9 bookmarks (not folders) in Bookmarks Toolbar
Cmd-?Safari Help
Cmd-[Back
Cmd-]Forward
Cmd-.Stop
Cmd-,Preferences…
Cmd-/Show/Hide Status Bar
Cmd-|Show/Hide Address Bar
Cmd-\Show Page Load Test Window
Cmd-=Define in OmniDictionary
Cmd-;Check Spelling
Cmd-Shift-:Spelling…
Cmd--(Cmd-minus)Make Text Smaller
Cmd-+Make Text Bigger
Cmd-Shift-*Get Result of AppleScript
Cmd-Shift-right-arrowSelect Next Tab
Cmd-Shift-left-arrowSelect Previous Tab
Cmd-Option->Send to…
Cmd-Option-,SafariStand Setting…
F5SafariStand Bar
Note that the above includes some command-keys that depend on certain applications being installed. If OmniWeb isn't installed, for instance, its command-keys won't be available within Safari.

Custom shortcuts

To set up your own keyboard shortcuts for your bookmarks, quit Safari, open Terminal and type:
defaults write com.apple.Safari NSUserKeyEquivalents ''
where keyCombo is one or more of the following:
@Command
$Shift
~Option
^Control